Setting up Microsoft Teams as a Public Phone System
In this article we will go through all the steps required for an IT administrator to set up an advanced Microsoft Teams call system for either a small or large sized company.
An advanced call system is vital for an organization to be able to assist customers in the best possible way. Most companies already rely on a call system like the one we will be setting up in this article.
Some of the key features that often makes a system like this very useful for a company, are features such as being able to configure a calling queue, or an auto attendant, or configuring something like how the calls are distributed throughout the company. There are also features like open/closed hours, vacation hours, etc.
Why pick Teams as a Public Phone System?
The advantages when considering Teams as a call system are many. Major factors to consider are advantages such as the server-less cloud setup that completely removes the burden of hosting special on-premise hardware and software. It’s also worth considering that you are pretty much guaranteed a robust system with no downtime because of this. Also worth mentioning, is the relatively straight forward process of setting the whole thing up, as well as the general license costs which are also attractive, once fully understood. The possibility to bundle phone numbers, and internal communications (PBX) in the same package, is also great.
One of the potential disadvantages for a setup like this, could be the fact that Teams is targeted for a broad audience, and the use case is one that is mostly generalized for the mainstream. This could present potential shortcomings for your company if it requires more advanced/customizable features, not available in Teams currently.
Prerequisites
To complete the setup, we require an IT-administrator with a general understanding of Microsoft Teams and Microsoft 365, and with the Global Administrator Role.
If your company is going to make use of Microsoft’s domestic/international calling plans, first make sure that your country/region is on the list of supported regions.
Licensing structure
The licensing structure for the call system consists of three elements:
- Teams License (for agents, and resource accounts)
- Phone System License (for agents, and resource accounts)
- Calling Plan license (to facilitate agents performing out-bound calls)
Keep in mind that based on your existing licensing it might not be necessary to purchase these licenses, because they might be included in an existing license package that your company uses.
For what license fits your company best, please take a look at this article explaining the voice add-ons licensing structure in detail.
For example the Microsoft 365 Business Voice license includes
- Phone System
- Audio Conferencing
- Domestic Calling Plan
The Microsoft 365 E5 license includes
- Phone System
- Audio Conferencing
Example of a company resource setup:
- 1 auto attendant
- 2 call queues
- 6 agents
This would require:
- 9x Microsoft 365 Teams license
- 9x Microsoft 365 Phone System license
- 6x Microsoft 365 Domestic and International Calling Plan or Microsoft 365 Domestic Calling Plan
This could also be replaced by 9x Microsoft 365 Business Voice license or Microsoft 365 E5, and a separate calling plan license.
Your company could also use existing phone numbers instead of Microsoft’s calling plan license, as this is supported.
Demo setup
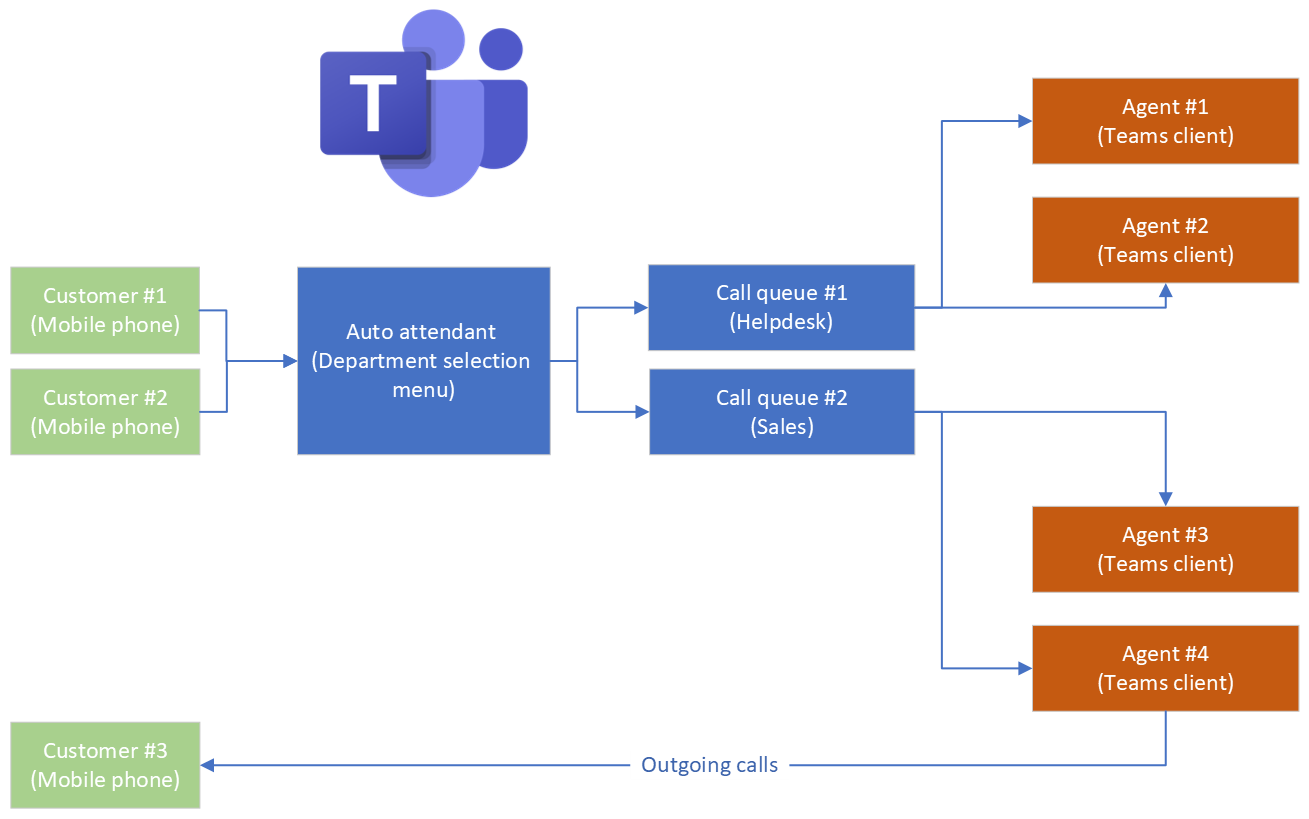
For the following demo we will aim for a setup that consists of two phone lines, one directly to the help desk call queue, and the other phone line will be linked to the auto attendant agent, which allows the customer to reach the help desk queue, or potential other queues.
Agents from the help desk queue will then be able to respond to the call from the customers. Since we use the default call distribution option, the call will reach all agents who are members of the assigned teams channel – The first agent to respond gets the call. In the demo we will only be setting up a call queue for the help desk. You can easily add several more call queues using the exact same concept, allowing the customer to have multiple choices.
Most of the setup will be done through the Teams Admin Portal, but some steps will be performed in PowerShell, because we experienced issues with the interface not having updated users with the correct license in a timely manner.
Licensing setup
Purchasing of Teams and Phone System licenses. In this case we make use of trial licenses. See the ‘License structure‘ paragraph for more details.
-
Step 1
Navigate to the Microsoft 365 Admin Center: https://admin.microsoft.com

-
Step 2
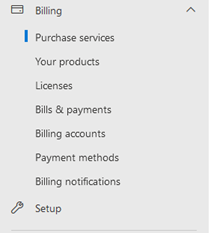
Navigate to ‘Billing’ > ‘Purchase services’
-
Step 3
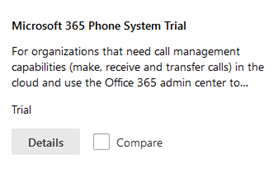
Search for ‘voice’ and add ‘Microsoft 365 Phone System’ In this example I will be using the Trial version of the license.
-
Step 4
Furthermore, you should ensure that you have valid Teams licenses available for any users that we create in this process.
Creating a resource account
Resource accounts are required for both Auto Attendants and Call Queues. You can think of them as a service account.
-
Step 1
Navigate to the Teams Admin Portal: https://admin.teams.microsoft.com/dashboard
-
Step 2
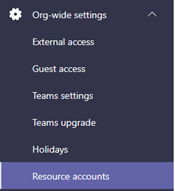
Navigate to ‘Org-wide settings’ > ‘Resource accounts’
-
Step 3
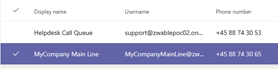
Press ‘Add’ and name the account something like ‘Helpdesk Call Queue’ This name is the name that recipients of the call will see.
Username ‘support’
Resource account type: ‘Call queue’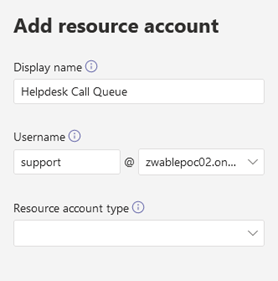
Assigning a phone license to the resource account
In order to perform the tasks that we need, we need to assign the correct licenses to the resource accounts.
-
Step 1
Navigate to the Microsoft 365 Portal: https://admin.microsoft.com
-
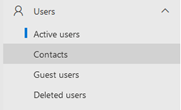
Step 2
Navigate to ‘Users’ > ‘Active users’
-
Step 3
Select the resource account user you created in the previous step and select ‘Manage product licenses’
Choose ‘Microsoft 365 Phone System’ and select ‘Save changes’
(The user is required to also be set up with a Teams or Skype for Business license already. In this case ‘Microsoft 365 Business Premium’ is used.)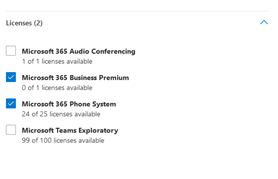
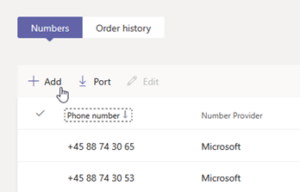
Setting up a phone number
For external clients to be able to contact our call queue directly we need to assign a number to the resource account.
Note: If we instead want users to go through the Auto Attendant, we do not need to assign a phone number to the Call Queue resource account, unless we want the option to call directly. In this example we will set a phone number up to both resource accounts.
-
Step 1
Navigate to the Teams Admin Portal https://admin.teams.microsoft.com
-
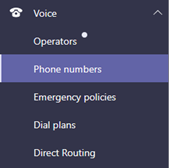
Step 2
Navigate to ‘Voice’ > ‘Phone numbers’
-
Step 3
Click ‘Add’ and select any appropriate information for your current location.
e.g.
Country: ‘Denmark’
Number type: ‘Call queue (Toll)’
Quantity: ‘1’
City: ‘All Locations’
Area code: ‘32’, or
‘88’ (not to be confused with country code).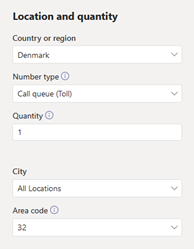
-
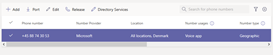
Step 4
It should look something like this
-
Step 5
Afterwards create one more number, but this time choose ‘Auto attendant (Toll)’ in the ‘Number type’ property. This number will be used for our Auto Attendant.
Assign phone number to Resource account
Use PowerShell to assign an existing phone number to a resource account, so it can be reached by customers
-
Step 2
Install the PowerShell Teams Module.
[Install-Module -Name MicrosoftTeams] -
Step 3
Connect to the Team Instance, write your Microsoft Credentials when prompted.
[Connect-MicrosoftTeams] -
Step 4
Add the Phone number to the Resource Account.
Not that it can take some time for the license to apply correctly.
[Set-CsOnlineVoiceApplicationInstance -Identity user@mycompany.onmicrosoft.com -TelephoneNumber +XXXXXXXXXXX] -
Step 5
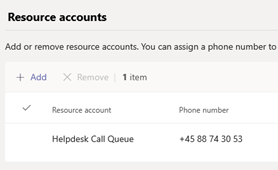
Confirm that the number is assigned in the portal, under ‘Resource accounts’
(May require you to press CTRL + F5, in order to clear the cache)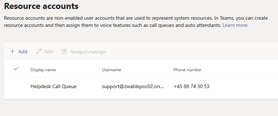
Voice-enable agents
Voice-enabling agents is a necessary step for them to be able to respond to calls. This is done through PowerShell
-
Step 1
Launch PowerShell and run the following command for the user who will respond to calls.
This can also be done in a bulk operation.
[Set-CsUser -Identity “user@mycompany.com” -EnterpriseVoiceEnabled $true -HostedVoiceMail $true]
Setting up the calling queue
This step allows to have an organized queuing system so that users will be automatically assigned to a receiver in the company, based on the setup configured.
-
Step 1
Navigate to ‘Voice’ > ‘Call queues’

-
Step 2
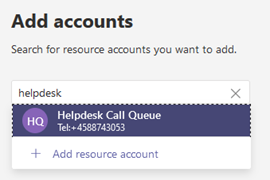
For ‘Resource accounts’, add the resource account we created earlier
-
Step 3
For ‘Assign calling ID’, add the same resource account we created earlier
-
Step 4
Choose the appropriate language
-
Step 5
Upload a Greeting sound if needed.
-
Step 6
For ‘Call answering’ press ‘Choose a team’ and select an existing Teams channel.
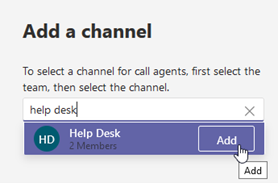
-
Step 7
Select the appropriate channel in the teams, you chose.
Apply the settings.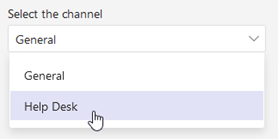
-
Step 8
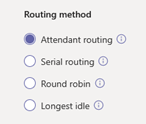
Choose the routing method suitable for your setup.
In this case we will use the existing setting ‘Attendant routing’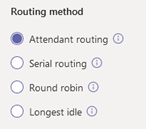
-
Step 9
I will leave the rest of the settings default. You can change any settings you need to.
Setting up the auto attendant
This step is necessary, if you wish you have multiple agent groups, and you wish to offer the customer a choice in picking what department they will be speaking to.
-
Step 1
In order to set up an auto attendant. You need to first create a new Resource account, then assign a Phone license to it, as demonstrated in previous steps.
Furthermore you should register a separate phone number the same way you did with the Calling queue resource account. -
Step 2
Navigate to ‘Voice’ > ‘Auto attendants’
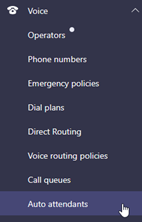
-
Step 3
Type ‘Auto Attendant Default’ or another name in the name field.
Press ‘Add’, choose an appropriate Time zone and language.
Enable voice inputs.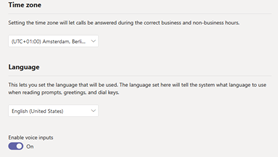
-
Step 4
Choose ‘No greeting’ as we will play a greeting in the following section.
-
Step 5
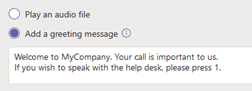
Route the call: ‘Play menu options’
Add a greeting message: ‘Welcome to MyCompany. Your call is important to us.
If you wish to speak with the help desk, please press 1.’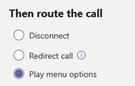
-
Step 6
Assign a dialing key.
Key: ‘1’
Voice Command: ‘Press 1 to reach the help desk.’
Destination ‘Helpdesk Call Queue’ (This is the calling queue that was created first, but not the auto attendant resource account.)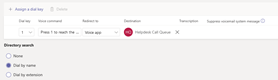
-
Step 7
Press Next. In this menu you can set up calling hours and choose what happens if users call outside opening hours.

-
Step 8
Press Next. In this menu you can set up custom Holiday messages
-
Step 9
Press Next. Optionally customize which users are available to be dialed.
-
Step 10
Press Next. In the Resource account menu, choose the Resource account that was created for the Auto Attendant step. In this case ‘MyCompany Main Line’, which is the line users will call.
Hit ‘Submit’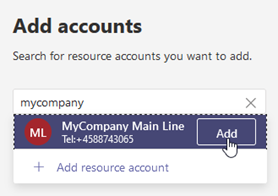
Testing the Auto Attendant and Calling queue
Simulate a customer trying to reach the help desk, by calling the main line, then going through the auto attendant, followed by the help desk call queue.
-
Step 1
From a phone, call the number assigned to the resource account for Auto Attendant. In this case I will be calling the number associated with ‘MyCompany Main Line’.
-
Step 2
We will be greeted with the welcoming message we created in the previous step.
-
Step 3
Press ‘1’ on the phone keypad, and you will notice that you are now redirected to the Resource account ‘Helpdesk Call Queue’

-
Step 4
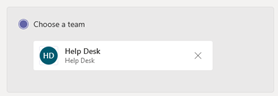
In the Call queue setup, we configured the Teams channel ‘Help Desk’ to receive the call.
-
Step 5
This means that all the users in this team channel, with a valid voice license, will receive the call, since we used ‘Attendant routing’ as our routing method.
Had we instead chosen ‘Round robin’, the call would be chosen at random at first, and then alternative between responders.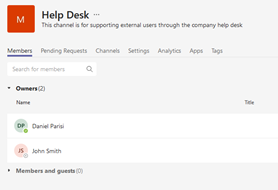
-
Step 6
Finally, we can observe that the call is now received on my machine.
Until I respond to the call, the user will be stuck in the queue.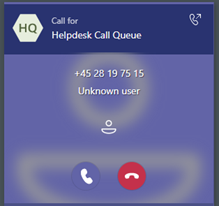
Configuring out-bound calls
For agents to initiate an external call outside the organization, we must both ensure that the correct licensing is in place, as well as configuring the phone number for the agent.
-
Step 1
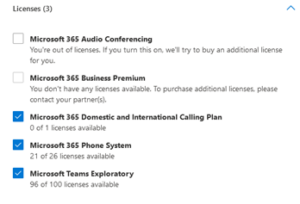
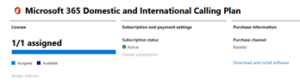
First off, we need to add the license called ‘Microsoft 365 Domestic and International Calling Plan’ (or any variation thereof)

-
Step 2
After we have purchased the license, add it to the user who needs to participate in out-bound calls.
-
Step 3
We must first set up an emergency address in the Teams portal, before we can set up user-type phone numbers.
Head over to ‘Locations’ > ‘Emergency addresses’
-
Step 4
Press ‘Add’ and fill in your company address.

-
Step 5
Next, we need to add a new user-type phone number in the Teams admin portal
Go to ‘Voice’ > ‘Phone numbers’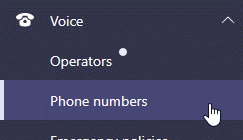
-
Step 6
Select ‘Add’
-
Step 7
Insert the following information.
Number Type: ‘User (subscriber)’
Quantity: ‘1’
Keep in mind when searching for location you must enter the CITY name. In this case ‘Copenhagen’ or it will not show up.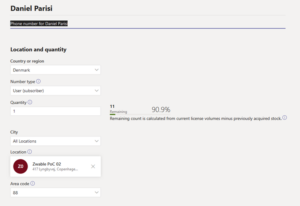
-
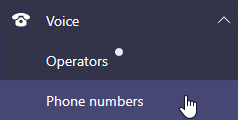
Step 8
Next in order to assign the number head back to ‘Voice’ > ‘Phone numbers’
-
Step 9
Find the number that you created and select ‘Edit’. From here assign the number to a user, as such.
If you are not able to add the user, ensure that the following licenses:
‘Microsoft Teams’, or any parent license that includes Teams
‘Microsoft 365 Domestic and International Calling plan’ (or any variation thereof)
‘Microsoft 365 Phone System’
Select ‘Apply’
You have now assigned a number to the user.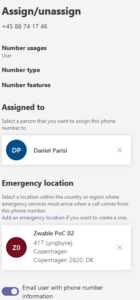
-
Step 10
Test the number by performing an out-bound call, from the client.
Configuring caller ID policy
In this example we would also like to configure the caller ID policy for our users. When agents make out-bound calls we would prefer the call-id be displayed as the Company Main Line number, rather than the agents personal number.
We can configure this the following way.
-
Step 1
First off, we need to add the license called ‘Microsoft 365 Domestic and International Calling Plan’ (or any variation thereof)
-
Step 2
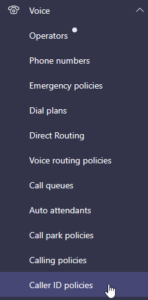
Navigate to ‘Voice’ > ‘Caller ID policies’
-
Step 3
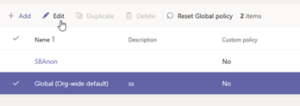
‘Edit’ the ‘Global’ policy.
-
Step 4
Configure as follows:
Replace the caller ID with: ‘Service number’
Replace the caller Id with this service number: ‘[Phone number of main line]’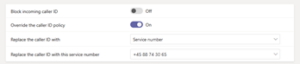
Final thoughts
Setting up a Teams phone system with some of the features that we went through, is a seamlessly straightforward process.
When you consider the fact that you don’t need to facilitate specialized hardware, and infrastructure, as well as whatever required knowledge that is associated with a setup like that, it becomes a very attractive solution.
Furthermore, Microsoft also allows for flexibility in terms of the phone numbers. For example, an already established business would be able to port in their phone numbers. Likewise, a smaller sized business could instead opt in for Microsoft’s own phone numbers. There are also plenty of configuration options and policy templates to work from, in the Teams Admin Portal.
One of the downsides of setting up a solution like this, is Microsoft’s licensing structure, which can be a bit hard to fully grasp at times and in some cases, very costly.
Get a no-obligation
IT consultation
Interested in learning how we can act as your internal IT department so you can focus on other things? Book a no-obligation meeting via the form below.
